
What if you suddenly run out of space in your home or root partition and want to use the left space from other HD partitions to get by till you make room or you get another HDD, all this on the fly? What if you want to double your home partition space with a spare HDD? Do you ever feel like you need some kind of mirror of your whole setup or a part of it, so you are prevented against hardware failures?
Logical Volume Manager (LVM) is a great answer to all of these questions. It is a tool implemented in the Linux Kernel that let’s you work with logical volumes (LV from now on), volumes that lay between the physical hard drives and the filesystems that will bring these LV to life. A LV needs to belong to a Virtual Grup (VG) in order to operate, as well as a VG can only exist after a Physical Volume (PV), which is the adaptation of a HDD or HDD partition so it can work with LVs. LVs, on its way, are divided in Physical Extents (PE), and they are the ones that determinate the size of a LV, though it is easily translatable to a human readable value. So, more or less, this is what we have:

Image source: wikimedia
Initial setup
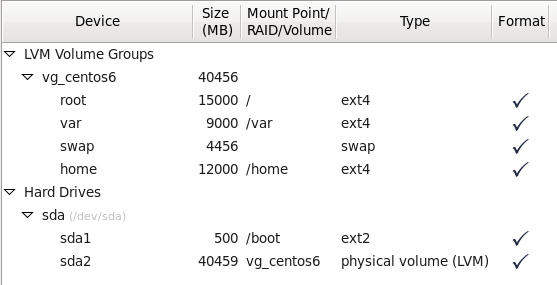
We created a Centos6 virtual machine environment in order to test the major capabilities of LVM and so we can safely do, undo and redo. Most of the distributions installers are able to work with LVM from the very beginning. We had a ~40GB HDD that we divided this way:
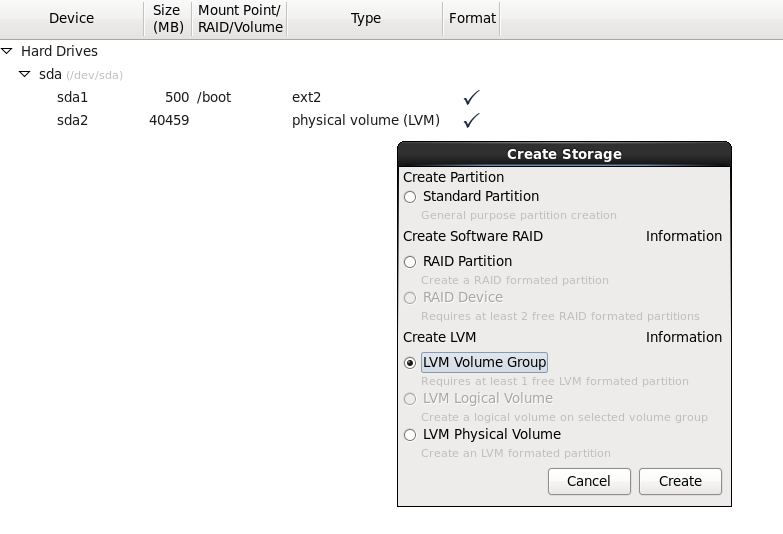
We created a 500MB ext2 /dev/sda1 standard partition that will contain /boot files. It is recommended not to have the boot partition under LVM as there are bootloaders that cannot read this kind of partitions. We then created a PV out of sda2 with the whole remaining HDD space. We made a VG from this PV named vg_centos6 that will separately contain root, var, home and swap partitions:
LVM flexibility
If you ever feel lost about any parameter of your LVM configuration, you can always paint it back with these commands:
$ pvs
$ vgs
$ lvs
The first will display information about PVs, the second about VGs and the third one about LVs. So that’s it! Let’s start playing with our LVM setup. To learn about LVM flexibility, let’s imagine a case where our home partition has no space left and we need to somehow extend it, but we don’t have any spare HDD to attach to our PC.
However, you realize that at some point you gave your swap space much more GB than those actually needed, always there sitting around. Why not moving them to our home partition? This is how we can do it:
First we need to unmount the swap partition:
$ swapoff
We can now reduce the size of the swap LV:
$ lvreduce -L -2G /dev/vg_centos6/swap
With this command we are shrinking our 4,5GB swap LV by 2GB. As so, we have to reformat it to tell it to occupy the new space created:
$ mkswap /dev/vg_centos6/swap
And we activated back:
$ swapon -va
We can tell the swap space reduction by issuing:
$ free -m
So now, as you can imagine, we have 2GB in our VG that are unallocated:

Let’s assign them to our home partition:
$ lvextend -L+2G /dev/vg_centos6/home
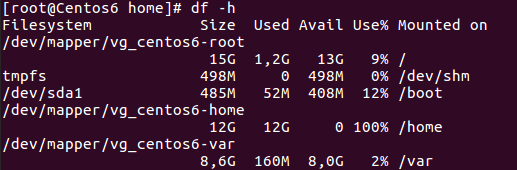
Now we have given 2GB of our VG free space to the home LV. However, unless we tell the file system to fit again in the partition, it will continue appearing as full. We can arrange that by:
$ resize2fs /dev/vg_centos6/home
Resulting in:
We brought back to life a file system that was at 100%.
Now imagine we want to expand the root LV with an extra HDD you attached to the OS. To do so we will add a raw 40GB HDD to our virtual machine. Let’s give it LVM format:
$ fdisk -cu /dev/sdb
The new partition id will be 8e (Linux LVM) and it will occupy the whole disk. Once written these parameters to the disk, we have to create a PV out of it:
$ pvcreate /dev/sdb1
We now extend our initial VG vg_centos6 with our latest incorporation:
$ vgextend vg_centos6 /dev/sdb1

We now have 40GB in our VG that are free to assign wherever we want. Let’s add 10GB to the root LV:
$ lvextend -L +10G /dev/vg_centos6/root
Again, we have to issue resize2fs so the file system recognizes the new added space:
$ resize2fs /dev/vg_centos6/root
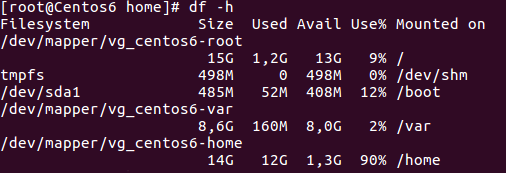
Before resizing:

After resizing:

We can say that our root partition is now transparently using space from two physical HDDs at the same time thanks to LVM.
Can I also shrink system partitions online? Yes as long as you are able to unmount them (i.e not in use by the system at a determinate point). We will now free 6GB from our home partition:
- We unmount the mount point.
$ umount /home
- We check the file system consistency by:
$ e2fsck -f /dev/vg_centos6/home
- If the five test steps were passed, we can now shrink the LV to the desired size:
$ resize2fs /dev/mapper/vg_centos6-home 8G
Notice that the latter value refers to the final size, not the reduction itself.
- We proceed to reduce the LV:
$ lvreduce -L -6G /dev/vg_centos6/home
- And now we only have to resize the file system so it exactly fits in the new LV size:
$ resize2fs /dev/vg_centos6/home
- We can safely remount it:
$ mount /home
And that’s it! Our VG will now be 6GB larger ready to assign if in need.
In our first steps with LVM we learned how to expand and shrink LVs on the fly using our own drive remaining space or newly attached HDDs to our OS.
Moving and mirroring LVs
LVMs, due to its flexibility and scalability, is frequently used in High Availability environments (HA). This is why they also implement a set of instructions regarding data replication.
For example, let’s suppose you want to move a PV (/dev/sda2) to a newly installed SSD (/dev/sdb1). The steps would be:
-
Create a PV out of the newly installed HDD.
-
Add the PV to the existing VG with vgextend.
-
Move the old PV to the new PV:
$ pvmove /dev/sda2 /dev/sdb1
Keep in mind that this may take a while regarding your configuration
-
Unattach the old PV from the VG:
$ vgreduce vg_centos6 /dev/sda2
And by this you could safely physically remove /dev/sda2 from your machine. This is an useful and a straightforward way to migrate PVs. However, this is not the safest way to do it in critical production systems, where data i/o is always being held. It is much more recommendable to use lvconvert.
Having a mirror of your installation is almost an obligation in sensitive setups. If you want to mirror your var LV, you can achieve it under LVM by issuing:
$ lvconvert --corelog -b -m 1 /dev/vg_centos6/var /dev/sdb1
Explanation:
- The –corelog flag means that the log needed to keep the mirror in sync won’t be stored in the hard drive, and the mirror will be resynchronized in every reboot.
- -b is to launch the process in the background.
- -m stands for mirror and is followed by the number of mirrors we want to set.
- We then set the LV we want to mirror and in which PV (always belonging to the same VG).
The mirror is now set. Every little change produced in the var LV will be reproduced in /dev/sdb1. By issuing:
$ lvs -a -o+devices
we will have full knowledge of what is going on with our LV mirror:

No more need to keep the mirror? We can always detach one of its legs by:
$ lvconvert --corelog -b -m 0 /dev/vg_centos6/var /dev/sda2

And by this we would have migrated our var LV to another physical partition in the safest way we could.
And what about snapshots?
Imagine that we want a snapshot of the root partition before playing around with some critical software that could in the end break our installation. Firstly we will need to create a LV capable to host all the capacity that is already being used for the volume we are about to take a snapshot, plus all the changes that will occur while the snapshot is on. If the snapshot LV ever reaches its full capacity, the snapshot feature will be broken since it won’t be able anymore to host changes and data will become corrupted.
We are going to create a 15GB snapshot LV of the root LV:
$ lvcreate -L15G -s -n rootsnapshotYYYYMMDD_HHMM /dev/vg_centos6/root

This newly created LV will increase its Data% capacity in consonance with the LV that is under snapshot. So, for example, if we create a 3GB file in the root LV, we will have:
$ cd root && dd if=/dev/zero of=large.file bs=1024 count=3M

The snapshot capacity in order to host changes produced has decreased a 20% due to this 3GB file in the root LV. When it reaches its maximum capacity, as said before, the data that it stores will become unusable and we won’t be able to restore the former LV to the point where the snapshot was created. If you happen to mount the LV snapshot, files will remain exactly the same as when it was created and, by this, you will always be able to restore to this original point. We can even tar the whole snapshot files so we can store backups of it in, for example, an external drive, but we can always restore a snapshot by:
$ lvconvert --merge /dev/vg_centos6/rootsnapshotYYYYMMDD_HHMM
However:

In this particular case, due to the impossibility to unmount the root LV online, we need to place a reboot. After it, the snapshot will be automatically restored and its LV will be removed. No trace of the modifications we did after setting up the snapshot. True is that the machine will be offline for a short period of time, but we will have the chance to recover a broken OS.
Snapshots shouldn’t be considered as the main backup option as they are not as reliable as a mirroring in terms of data consistency or restoring capabilities. However, they can be really useful and save us a headache in some particular scenarios. The key is to combine, know our needs and act accordingly.
Exporting and importing VGs and their configuration
You may find yourself in the need to restore your LVM configuration / layout. For example, if one of your mirrored LVs is hardware damaged and needs to be replaced, with vgcfgrestore you will be able to redraw your LVM configuration to the disk, so it is important that you previously backup your LVM metadata:

This file contains every little bit of the LVM layout of the VG configuration we exported. It is good to know that the system automatically creates these backup files under /etc/lvm/backup when doing sensitive operations with LVM, and that they are being archived in /etc/lvm/archive. So, whenever you need to rewrite the VG metadata to a PV, you can do it issuing:
$ pvcreate --uuid "ObQDtz-DuvG-SY3a-kzM9-u2Dt-TxUZ-pEweti" --restorefile /tmp/vgcfgexport.conf /dev/sdb1
and then
$ vgcfgrestore -f /tmp/vgcfgexport.conf vg_centos6
In here we are creating a PV with the same UUID of our /dev/sdb1 (supposing that its lvm metadata broke), and we are telling to restore the VG configuration we previously exported to a file. We can always know our volumes UUID from the backup configuration files.
Do not forger that vgcfgbackup|restore command only restablishes the broken lvm metadata / structure; the disks must contain by themselves the data.
VGEXPORT and VGIMPORT
Unlike vgcfgbackup|restore, which only refers to LVM metadata backup and restore, vgexport is useful if we want to export our VG to another machine. It does undo the VG without touching any of the data stored in the LVs. To do so, it is necessary to disable the VG and prepare it to exportation. We created data VG that contains two LVs in PV /dev/sdb1 and we will export it to another machine. Firstly we need to unmount the LVs and disable the VG so no data is written
$ umount /dev/data/data1
$ umount /dev/data/data2
And now we disable the VG:

And then we export the VG:
$ vgexport data
We can now physically extract the PV and attach it to the new machine. The new machine will directly recognize it:

However:

We now import the VG:
$ vgimport data
And activate it:
$ vgchange -ay data

Success! We have our VG data back, with all its files and LVs. We can mount it and work with it as if we were in our previous installation.
Conclusion
LVM is the swissknife tool regarding storage capabilities. Flexibility, scalability, solid backup feature, ease of deployment… After this brief introduction to LVM and its benefits, will you still be considering using the old HDD partitioning way? I, particularly, surely won’t.

